|
The
B-24 Liberator
& Its Crew (rev. May 3, 2023) Copyright 2012-2024  Dad was an enlisted soldier from Columbus, Ohio and the crew's senior armorer, aerial photographer, and waist gunner, which was his primary role. As a waist gunner, he was one of two fellows who stood in an open bay window on each side of their four-engine plane and shot at enemy fighter planes with a belt-fed .50 caliber machine gun. He fired from the right side of the aircraft. As the ship's senior armorer, dad was responsible for intimate knowledge and maintenance of all gun positions and for assisting the bombardier in arming the bombs. As a waist gunner, he would also have been responsible at times for dispensing thin strips or ribbons of shredded metal called "chaff" (sometimes referred to as "window" in some texts) to confuse enemy radar. One of the two waist gunners typically served as the radio operator. Dad manned a camera sometimes to record photos of the mission for later use and analysis. This page delves into more of the details about the B-24 Liberator itself. The B-24 Liberator The Consolidated B-24 Liberator was an American heavy bomber, designed by the Consolidated Aircraft Company of San Diego, California. The term “heavy bomber” was primarily used prior to and during World War II to describe bombers with the largest bomb capacities and longest ranges. During World War II there were three heavy bombers - the B-17 Flying Fortress, the B-24 Liberator, and late in the war the B-29 Superfortress. The term "heavy bomber" is largely disused now since even small fighter aircraft can now carry heavy bomb loads due to aeronautical design advancements, especially those pertaining to the development of the jet engine and subsequent engine design and performance enhancements. Heavy bombers of the WWII era also were distinguished by their heavy defensive armament, for protection from smaller and usually much faster fighter aircraft. British designs often had three gun turrets with a total of eight machine guns. U.S. heavy bomber designs, optimized for formation flying, had upwards of ten machine guns and/or cannons in both powered turrets and manually-operated flexible mounts to deliver the optimal protective arcs of fire. Positions for these guns included tail turrets, side gun ports (typically a window with a .50 caliber machine gun), and dorsal (spine/top of aircraft) and ventral (belly/bottom of aircraft) gun positions with powered turrets. All of these machine guns were designed to enable the crew to defend the aircraft from attacking enemy fighters, especially at times when the bombers were not being escorted by their own fighters. The American innovation of the manned, ventrally-mounted Sperry ball turret on the B-17 and B-24 bombers was a virtually self-contained defensive weapon system that rotated a full 360 degrees horizontally with a 90-degree elevation, and its pair of M2 Browning machine guns had an effective range of one thousand yards. Introduced later in the war, the B-29 Superfortress brought the innovation of four remotely operated twin-gun turrets on its fuselage, controlled through an analog computer sighting system. Only the rear tail gunner position on the plane was manned by a crewmember. The B-24 originated in a 1938 request by the Air Corps for Consolidated Aircraft to produce B-17s. However, Consolidated's engineer, David Davis, had designed a wing suited for long-range bombers, a wing that offered 15 percent less drag than ordinary wings. The wing entailed a high aspect ratio design. Aspect ratio is the ratio of legth over chord wideth or essentially length divided by wideth. In practical purposes this simply means the the wing was long and slender. Consolidated's engineers sketched out a rough version of a bomber using Davis's wing in late 1938. It would be a four-engine, high-wing, tricycle landing gear, dual bomb bay aircraft. The Liberator was effectively born.  Long & slender Davis wings The first B-24s were produced for the British, who gave it its name of Liberator, and for the French. The aircraft ordered by the French were delivered to the British since the French had surrendered before production of their order was completed. The B-24 Liberator’s mass production was brought into full force by 1943 with the aid of the Ford Motor Company through its newly-constructed Willow Run facility in Michigan, where peak production had reached one B-24 per hour and 650 per month in 1944. Through the course of the war Willow Run manufactured 8,685 bombers and assemble another 6,792 bombers and employed 80,000 workers. Other factories soon followed and added to production figures, making the Liberator the most-produced heavy bomber during the war of all time at over 18,400 units, due largely to Henry Ford and the harnessing of American industry. The Liberator still holds the distinction as the most-produced American military aircraft, having been manufactured by Consolidated Vultee, Ford Motor Company, Douglas Aircraft, and North American Aircraft between the years of 1939 and 1945. The B-24 was used by several Allied air forces and navies and by every branch of the American armed forces during the war, attaining a distinguished war record with its operations in the Western European, Pacific, Mediterranean, and China-Burma-India theaters of operation. The B-24 is especially recognized as having been instrumental in destroying the German U-boat fleet and significantly curtailing its abilities and effectiveness. The B-24 even saw duty in the Aleutian islands as a deterrent to Japanese invasion through Alaska. B-24s saw battle from the very start of the war. In fact, a B-24 was destroyed at Hickam Field on December 7, 1941 during the Pearl Harbor attack. The British employed versions of the B-24 in its wartime effort as well. While the targets of the American air force were military, industrial, and economic centers and systems, the British targets were selected to impact the morale of the German people. The British typically bombed at night as bombing accuracy was not as important as compared to the American bomber missions since the British targets were not strategic objectives like single point targets such as railroad marshalling yards, troop concentrations, and aircraft and ball bearing factories. The Americans bombed during the daytime and early on in the war, this daylight precision bombing decision was under scrutiny by top levels within the United States military organization and at risk of being reversed due to high losses. The structure of the American Army Air Forces organization consisted of Army Air Forces, Air Wings, Bomb Groups, (Bombardment Groups) and Bomb Squads (Bomber Squadrons). In dad's case he was part of the 15th Army Air Force, 55th Air Wing, 460th Bomb Group, 763rd Bomb Squad. The number of aircraft assigned to a Bomb Group varied during the war and sometimes standard numbers may not seem to have existed. Generally speaking, in 1943 a heavy Bomb Group supported 48 heavy bombers (B-24s or B-17s). By February 1945 the number of aircraft within a typical Bomb Group had increased to 72. Four Bomb Squads typically comprised a Bomb Group and four Bomb Groups comprised an Air Wing. Comparison to the B-17 Flying Fortress Often compared with the better-known B-17 Flying Fortress, the B-24 was a more modern design with a higher top speed, greater range, and a significantly heavier bomb load capability. At one time the B-24 was the only large aircraft capable of non-stop transatlantic flight and, consequently, was used to shuttle back to the states pilots who had flown a shipment of B-24s overseas. One B-24 variant, the C-87, was the premier cargo aircraft of its day. However, the B-24 was notoriously difficult to fly, with heavy control forces and poor formation-flying characteristics. Popular opinion among aircrews and general staffs tended to favor the B-17's rugged qualities and sleeker appearance over the B-24's boxy appearance. Many gunners preferred the vertical-sided B-24 for its roominess during battle. Many preferred the sleeker, traditional looks of the B-17, but many also preferred the futuristic dual rudder appearance of the B-24. The placement of the B-24's self-sealing fuel tanks throughout the upper fuselage and wings and its lightweight construction, designed to increase range and optimize assembly line production, made the aircraft vulnerable to battle damage. A damaged B-24 was far less likely to stay airborne than a similarly damaged B-17, although by the end of the war the normalized accident rate of both aircraft was very similar and is attributable to the numerous improvements made to the B-24 during the course of the war. Former 460th Bomb Group pilot Keith Mason describes the ruggedness and resilience of the B-24 in his novel entitled My War In Italy as "tougher than a two dollar steak". He notes that it was indeed a tough aircraft to fly. One advantage the B-17 had was a high ceiling or altitude capability. The B-24 was notorious among American aircrews for its smell of leaking aviation fuel and hydraulic fluid, and consequently for its tendency to catch fire. Moreover, its characteristic high fuselage-mounted Davis wing also meant it was dangerous to ditch or belly land, since the fuselage tended to break apart, lacking the reinforcement common with a lower-mounted wing aircraft. However, those same wings, designed by self-taught aerodynamicist David Davis, provided the high aspect ratio, previously unattainable efficiency, and marked increase in lift and the resultant payload capacity as compared to traditional wing designs of the day. Consequently, the B-24 provided excellent service in a variety of roles and variants thanks to its large payload, long range, heavy armament, and sheer numbers produced. Rivalry amongst B-17 and B-24 crews continued throughout the war. One common jab B-17 crews would take at their B-24 brethren was to say that the B-24 crews flew the crates the B-17s were shipped in. The B-24 never gained the popular appeal of the Boeing B-17 Flying Fortress, even though the B-24 was newer, more efficient, built in far greater numbers and, unlike the B-17, served on every front in World War II. More effort, more aluminum, and more aircrew went into the Liberator than into any other flying machine ever built. Nothing better highlights the American industrial might and capabilities than the fact that the prototype Liberator did not even fly until after the beginning of World War II, and the last (except for the PB4Y-2 model) rolled off the assembly line before the end of the war; yet, in those few production years, deliveries of 15 major variants totaled over 18,000 aircraft. This compares with only 12,731 B-17s produced. The B-24D variant saw the addition of superchargers that allowed for flights at higher altitudes. The Liberator, or Miss Liberator as it was referred to at times, was a complicated and advanced machine, leading to prolonged pilot training programs and, on occasion, to severe attrition. Unlike the B-17 that was designed and improved during the leisurely non-war period, the B-24 was designed at the prelude to war and modified throughout its course, all on demanding schedules. As a result, the B-24 was not built with the same thought of crew space and comforts of a fully-evolved peace-time aircraft. Ingress and egress was not fully thought out and crew were left to decide whether to enter through the bomb bay or through the nose wheel compartment. Not only was the B-24 demanding to fly, even for a fully-qualified pilot, it was eventually cleared to operate at such high weights that takeoffs became dicey even with full power on all engines. Flight stability was marginal, and escape from a stricken machine was extremely difficult once the pilot and copilot had let go of the controls. One crewman said "You don't know what shit hittin' the fan means 'till you've seen a Liberator flip over on its side in the middle of a forty-plane formation". Moreover, though more modern and in most ways more efficient than the B-17, the overloaded late-model B-24s were hardly any improvement over their more primitive partners, and several commanders, including Jimmy Doolittle, famed commanding general of the 8th Air Force, preferred the old B-17.   The B-24's most infamous mission was the low-level strike against the Ploesti oil fields in Romania on August 1, 1943, which turned into a disaster because the enemy was underestimated and fully alerted, while the attacking force was disorganized. The B-24 underwent numerous design revisions and construction modifications during the course of the war. Most changes were intended to increase is durability in combat or payload, while some were to custom-tailor the bomber to specific needs which varied by theater of operation or particular mission. The first version, the B-24A, was over three feet shorter and 10,900 lbs lighter than the B-24M which was produced toward the end of the war. Changes often came fast and furious and the ability of factories to incorporate changes to the production line or retool as necessary to accomodate the changes was not possible without impacts to productivity, production goals, and the overall war effort. Consequently, aircraft were often produced to prior specifications and the aircraft were next sent to modification centers to receive the most current design revisions. Certified Specifications (B-24J) • Top Speed @ Alt: 295 mph True Air Speed @ 25,000 feet, 50,000 lbs. aircraft weight • Cruise @ 5,000 ft: 158 mph Indicated Air Speed/169 mph True Air Speed @ 31" Hg/1650 rpm (60,000 lbs.) • Cruise @ 25,000 ft: 150 mph IAS/222 mph True Air Speed @ 31" Hg/2100 rpm (60,000 lbs.) • Climb: 25.5 minutes to 20,000 ft (60,000 lbs.) • Climb: 43 minutes to 30,000 ft (60,000 lbs.) • Fuel to climb (25,000 feet): 240 gallons • Distance to climb (25,000 feet): 140 miles • Takeoff distance to clear 50 feet: 4,250 feet (60,000 lbs.) • 1 g stall speed, clean: 123 mph Indicated Air Speed (56,000 lbs.) • 1 g stall speed, landing: 101 mph Indicated Air Speed (56,000 lbs.) • Slow flight: stable with good rudder control up to the point of stall. • Stall: Very mild wing drop. Recovery is routine. • Empty weight: 36,500 lbs. • Ramp Weight (equipped with oil and crew): 39,175 lbs. • Maximum takeoff wt: 65,000 pounds • Vmax: 275 mph Indicated Air Speed • To Gear Down: mild pitch down • To Flaps Down: mild pitch up • Engines: Four Pratt & Whitney R-1830-43 air-cooled 14-cyl. radials • Takeoff power: 1200 BHP @ 49" Hg/2700 RPM • Emergency power: 1350 BHP @ 53" Hg/2700 RPM • Max climb power: 1100 BHP @ 46" Hg/2550 RPM • Normal climb power: 990 BHP/39" Hg/2550 RPM • Max cruise power: 820 BHP/35" Hg/2325 RPM (Auto Rich) • Normal cruise power: 610 HP/30" Hg/2000 RPM (Auto Lean) • Fuel capacity: 3,576 gallons with bomb bay tanks [source: http://www.shockwaveproductions.com/wingsofpower/manual/b24.htm] Additional Specifications of B-24J Liberator Many B-24 missions were round trips of 1,500 miles and some extended ranges were near 2,000 miles. Its altitude over heavily defended targets in the European Theater was from 18,000 to 28,000 feet. The planes were not pressurized or heated; crewmen wore oxygen masks at altitudes over 10,000 and were exposed to temperatures that could reach -50 degrees Fahrenheit. Some flight suits were electrically heated via plug into a 24 volt electrical system. Those systems were fraught with problems and often did not work. Flight positions were equipped with ports for connecting to oxygen, communication, and electrical outlets for heated suits. The pictures below were taken by me on the Collings Foundation's B-24 Witchcraft in April 2013 and show an outlet for heating suits, a portable oxygen tank, and a fixed oxygen tank.    Powerplant Four Pratt & Whitney R-1830-65 Twin Wasp fourteen-cylinder air-cooled radial engines with General Electric B-22 turbo-superchargers rated at 1,200 hp at 2,700 rpm for takeoff and maintaining this power as a military rating up to 31,800 feet. Performance Maximum speed 300 mph at 30,000 feet, 277 mph at 20,000 feet. Maximum continuous speed 278 mph at 25,000 feet. Usual combat operating speed was 180-215 mph at between 10,000 and 25,000 feet. Initial climb rate 1,025 feet per minute. At a takeoff weight of 56,000 pounds, an altitude of 20,000 feet could be reached in 25 minutes. Service ceiling 28,000 feet at 56,000 pound takeoff weight. Range and endurance with a 5000-pound bomb load was 1,700 miles in 7.3 hours at 25,000 feet (all-up weight of 61,500 pounds) with 2,364 gallons of fuel. Landing speed 95 mph (light), 125 mph (loaded). Weight & Fuel 38,000 pounds empty, 56,000 pounds combat, 71,200 pounds maximum overload. 2,364 US gallons of fuel in main tanks, plus 450 gallons in auxiliary wing tanks, and 800 gallons in extra tanks fitted in bomb bay if required for a total capacity of 3,614 gallons. Dimensions Wingspan: 110 feet 0 inches; length: 64 feet 2 inches (varies by model); height: 18 feet 0 inches; wing area: height to top of fuselage: 12 feet 1 inch; height to top of rudder: 17 feet 11 inches; 1048 square feet. Accommodation: Normal crew size: 10 (pilot, copilot, bombardier, nose gunner, navigator, radio operator, ball turret gunner, two waist gunners, and tail gunner). To provide a sense of scale of the Liberator, see the photo below of a B-24D named the "Fighting Sam".  Armament Ten 0.50-inch (.50 caliber) Browning (typically, although other manufacturers were used) machine guns in nose, upper, belly, and tail turrets and in the right and left waist positions. Maximum internal bomb load was 8,000 pounds. Two 4,000 pound bombs could be carried on external racks, one underneath each inner wing. The maximum short range bomb load was 12,800 pounds (by using underwing racks), but normally the offensive load was 5,000 pounds. Engine Starting Sequence Prior to starting the engines the propellers were hand rotated several times to ensure that any pooled oil in the cylinders was either deposited on the cylinders walls or vented. Engines could be started by onboard batteries or by an external battery cart. Engines were numbered as if from the pilot's perspective, i.e., the left (port) engine is No. 1, and the No. 3 engine is the inboard engine on the right (starboard) side. The B-24D flight manual from Aviation Publications indicates engines are started in the order No. 3, No. 4, No. 2, and finally No. 1. They were started in this order, which is from inboard to outboard on each side, so that the Engineer does not have to walk through or toward a moving propeller when standing by with the portable fire extinguisher. The No. 3 engine is started first because it powers the ship’s primary hydraulic pump. Many controls and functions of the B-24 were hydraulically-controlled, much more so than the B-17 which employed a much greater use of electrical controls. There was also an auxiliary hydraulic pump installed in the aft bomb bay, and on the early B-24s it was often cited as a cause for fires and explosions as the pump's electric motor could arc, causing an explosion. The early B-24s often had a fuel leak in the bomb bay area; consequently, the bomb bay doors were left cracked slightly to ventilate the fumes to minimize the risk of fire and explosion. The B-24 Pilot Training Manual, revision May 1, 1945 indicates that the engines power the following accessories: Engine No. 1 - electric generator, two magnetos, fuel pump, turbo-supercharger, and vacuum pump; Engine No. 2 - electric generator, two magnetos, fuel pump, turbo-supercharger, and vacuum pump; Engine No. 3 - electric generator, two magnetos, fuel pump, turbo-supercharger, and hydraulic pump; and Engine No. 4 - electric generator, two magnetos, fuel pump, and turbo-supercharger. The copilot, who usually starts the engines, checks visually to see that all personnel and obstructions are clear of the propellers, calls "ALL CLEAR", and is check answered "ALL CLEAR" by the Engineer. Bombs & Arming Them The most common bomb load was ten 500 pound bombs or five 1,000 pounders. Fuses were installed in the bombs at the time they were loaded on the aircraft. The bomb shackle that carried the bomb had three points, the end two held the bomb by releasable hooks and, for one common type of bomb fuse, the third held the arming wire. The arming wire was a long wire that was inserted into the fuse. When the bomb was released, the arming wire was retained and thus pulled out of the fuse as the bomb dropped. This then allowed a small propeller, called the arming vane, on the nose fuse to rotate through many turns, somewhere around 260, at which time the propeller would fall away. The fuse, and hence the bomb, was then armed. This design allowed the bomb to be free and clear of the aircraft before it was even armed.  There were various types of fuses that could be used. Two popular fuses were the acid fuse and the proximity fuse. One of the dangers of an acid fuse was that there was a tiny fragile glass container  of
nitric acid with a plate between the nitric acid and fulminate of
mercury. Damage to the bomb which resulted in the breaking of the glass
vial could detonate the bomb, even if it were not armed. Runways
were often a cause for rough landings
due to
the use of PSP or Pierced Steel Planking, otherwise known as
Marston
Planking, and if that small, fragile glass container of nitric acid was
broken on any acid fuse bombs brought back, the bomb would detonate at
or shortly after landing, depending on the delay setting. By
varying the thickness of the metal plate the delay could be set. Delays
could be set to up to 72 hours. A similar fuse used acetone
and a
celluloid disk instead of acid and reactive metal material. The disk,
which would be eaten away by the acetone once the glass vial containing
the acetone was broken by the action of the spinning fuse propeller,
held back a spring-loaded detonating pin. of
nitric acid with a plate between the nitric acid and fulminate of
mercury. Damage to the bomb which resulted in the breaking of the glass
vial could detonate the bomb, even if it were not armed. Runways
were often a cause for rough landings
due to
the use of PSP or Pierced Steel Planking, otherwise known as
Marston
Planking, and if that small, fragile glass container of nitric acid was
broken on any acid fuse bombs brought back, the bomb would detonate at
or shortly after landing, depending on the delay setting. By
varying the thickness of the metal plate the delay could be set. Delays
could be set to up to 72 hours. A similar fuse used acetone
and a
celluloid disk instead of acid and reactive metal material. The disk,
which would be eaten away by the acetone once the glass vial containing
the acetone was broken by the action of the spinning fuse propeller,
held back a spring-loaded detonating pin.
 500lb Bombs - note that
the bomb on right is equipped with a proximity fuse
Once the acid fuse was installed, any attempt to remove it could set the bomb off. If the mission were aborted or the bombs could not be dropped for some other reason, the crew would typically not land with bombs aboard. In such cases, the bombs would be "salvoed" or dropped, unarmed to rid the aircraft of them. When salvoed, the fuse arming wire was released along with the bomb. One crewman noted that on the B-17, if the RDX bombs were carried, they were always loaded on the four lower stations, and, in the event they could not be dropped, they were salvoed into the Adriatic Sea, thus earning the label "Adriatic Fish Killers" for the 15th Air Force. Another type of bomb fuse, the proximity fuse, used the same technology used in some artillery shells which allowed the bomb or shell to detonate when it came into a preset range of a target. To confuse the enemy this fuse was intentionally and misleadingly referred to as the "Variable Time" or VT fuse. Proximity fuses worked using basic radio waves. A radio signal was transmitted by electronics in the bomb or shell and bounced of whatever was nearby. A receiver in the bomb or shell essentially compared the return signal to the transmitted signal and when the two were nearly in phase a capacitor discharged and activated a small charge which served as the detonator. Significant research and effort went into the development of the fuse and its rugged electronics and battery system. One source cites that at one time three percent of all physicists working for the government were focused on its development. Proximity fuses were very effectively used in fragmentation bombs against troop concentrations and the fuses' use is cited as one of the reasons for the victory at the Battle of the Bulge at Ardennes. Stewart Halsey Ross cites the effective use of proximity fuses in his book entitled Strategic Bombing By The United States In World War II: The Myths And The Facts. It that case, the proximity fuses were set to explode 50 feet above ground to maximize damage to enemy ground forces. Other types of fuses include impact or contact fuses that detonate the bomb's explosive material via a mechanical spike or firing pin or electrical impulse. Some bombs had two fuses, one on the tail end and the other on the nose of the bomb. One fuse could be an impact fuse while the other could be a time-delayed fuse. Depending on the target the appropriate fuse would be selected and its safety wire would be connected to the bomb harness apparatus and the other safety wire would not be connected and allowed to simply fall away with the bomb when dropped. A time-delay fuse would be more ideal than an impact fuse when, say, bombing a factory where a slight delay would allow the bomb to penetrate the building somewhat prior to explosion as opposed to expending its energy on the roof. I've read one account in which a former B-24 crewman discusses having to disarm bombs prior to landing, so landing with bombs, at least perhaps certain types of bombs or fuses, seems to have been done. I've included the recollection of that B-24 waist gunner: "Part of our job was to go out into the bomb bay and arm those bombs. That wasn't bad; all you had to do was pull a wire out. On a recall, when they want you to bring it all back home, we had to go out and wire all them damn things up again. You're hooked up to a five minute oxygen bottle and you have to keep running back and forth along the catwalk...which was like a gangplank over a 20,000 foot drop. Just to make it more fun, there were cluster fragmentation bombs, which we had to lean way out for. Flak was our companion on most missions. Our first mission, to Brunswick, carried us over the Zuider Zee and they had a barge with guns on it, down there. Those gunners were good! All they ever shot was 88mm and 105s. The way you could tell the difference was that the 105s came up with white puffs, the 88s sent up oily black puffs. Those 88s could pick your eye teeth out. We got a burst that hit near some oxygen tanks on the left side of the waist section. I looked at the angle those damn things was pointing in and it could have been like a torpedo headed right for me. Fortunately, it was my lucky day. Black or white, those puffs were deadly and we didn't like either." [source: http://www.b24.net/stories/krejci.htm]  This Liberator was hit by a bomb dropped by another B-24 in the formation. Obviously, the bomb had not armed itself by the time of impact. There were many types of bombs used during the war, such as incendiary, napalm, chemical (mustard gas and smoke), the VB-1 AZON bomb (somewhat guidable), fragmentation, glide, armor piercing, general purpose, propaganda, photoflash, and the Disney Rocket bomb for piercing concrete bunkers up to 20 feet thick. Mustard gas bombs were available, but not used by the Allies or most of the Axis forces during the war. Early in the war the Italians used chemical weapons in Ethiopia and Libya. The Germans were suspected of using chemical weapons on the Russians, which resulted in a warning from Winston Churchill that such use would result in use of chemical weapons on the Germans. Churchill was also prepared to gas German cities as a last resort. The Japanese used mustard gas and blistering agents on the Chinese. The American and British forces certainly had chemical weapons available to be used as a weapon of last resort and extreme retaliation. The aftermath of the December 1943 German raid on the Port of Bari proved that the Americans did possess chemical weapons, but fortunately there was no cause during the war which resulted in their use. The two largest high explosive bombs ever made were the Royal Air Force's 22,000 lb. Grand Slam and the 12,000 lb. Tallboy. A common bomb explosive used a mixture of TNT and ammonium nitrate. Later in the war the more potent RDX explosive was used. RDX, or Research Department Explosive, is an explosive nitroamine widely used in military and industrial applications. One of the first plastic explosives, it was developed as an explosive which was more powerful than TNT, and saw wide-scale use in World War II. RDX could be very sensitive, especially at low temperatures, although measures were taken to reduce the sensitivity of the explosive due to cold. A 500 lb. RDX bomb created a crater two feet deep and nine feet in diameter in sandy loam soil. A 1,000 lb. bomb would create a 13 feet deep, 45 feet diameter crater in the same soil. Ironically, the explosive which became known as RDX was a German invention. The photoflash bomb was an interesting one used for nighttime photography. It lit an area for about one fifth of a second with a blinding 500 million candle power light. In 1944 the US developed an early smart bomb called the Azon bomb. Azon was an abbreviation for "Azimuth Only"  since control of the bomb
trajectory was limited to its azimuth. The control allowed
for
only left and right adjustments to be made. Pitch and rate of
fall
could not be made. The fins on the 1,000 and 2,000 lb
bombs were
equipped with a radio control apparatus that allow the fins to deflect
somewhat. The bomb was controlled by the bombardier
who tracked it
in
its descent via attached flare which also emitted a smoke trail.
Another more advanced guided bomb was the ASM-N-2 radar-guided bat
bomb. It was an early experimental air-to-ground glider bomb that
carried a 1,000 lb general purpose explosive charge. It was used by the
Navy and often launched from a B-24 variant, the PB4Y Privateer. The
Privateer could carry two bat bombs, one under each wing. Bat bombs
could also be launched from a fighter which had the capacity to carry
one bomb. Although heavy and cumbersome, the bat bomb generated enough
lift in transport that it effectively carried 60% of its own
weight. Radar apparatus allowed the bomb to make adjustments in flight
to home in on its target. One success story reports the hit on a
Japanese ship from a bat bomb launched 20 miles away. since control of the bomb
trajectory was limited to its azimuth. The control allowed
for
only left and right adjustments to be made. Pitch and rate of
fall
could not be made. The fins on the 1,000 and 2,000 lb
bombs were
equipped with a radio control apparatus that allow the fins to deflect
somewhat. The bomb was controlled by the bombardier
who tracked it
in
its descent via attached flare which also emitted a smoke trail.
Another more advanced guided bomb was the ASM-N-2 radar-guided bat
bomb. It was an early experimental air-to-ground glider bomb that
carried a 1,000 lb general purpose explosive charge. It was used by the
Navy and often launched from a B-24 variant, the PB4Y Privateer. The
Privateer could carry two bat bombs, one under each wing. Bat bombs
could also be launched from a fighter which had the capacity to carry
one bomb. Although heavy and cumbersome, the bat bomb generated enough
lift in transport that it effectively carried 60% of its own
weight. Radar apparatus allowed the bomb to make adjustments in flight
to home in on its target. One success story reports the hit on a
Japanese ship from a bat bomb launched 20 miles away.Even with the best of training and precaution, accidents occurred while handling bombs. One source cites two accidents during bomb transportation and loading. Per the crewman's recollection, one bomb was dropped from a trailer in the United Kingdom; it detonated and destroyed three aircraft and killed 20 persons. The other accident happened in the 99th BG bomb storage area and also was the result of a bomb dropped while loading on the trailers for transport to the aircraft. Perhaps 22 men were killed in that accident. Many of the bombs that were dropped on Germany and elsewhere never exploded and create hazards to this day. There are numerous very recent accounts available online of the old relics exploding on construction sites when disturbed after all these years.  This
Liberator, above, lost its outer left wing panel when it was hit by the
body
of an airman falling from another Liberator during the Ploesti mission. 
 One
of the most famous photos of the war (left), this Liberator from the
779th
BS of the 464th BG took a direct flak hit to a wing while taking part
in the crew's 15th mission in support of the 8th army. Only
one crew member survived. The picture on the right is of a
B-24 that was cut in half by an attacking German jet fighter, the
ME-262.
Willow Run Factory The B-24 that my dad was shot down in was one of 8,685 Liberators manufactured at Ford's Willow Run plant in Michigan. The War Department asked Ford to put its production know-how and formidable abilities to the task of producing planes at an unprecedented rate, essentially to build them faster than they were being destroyed by the enemy. 

The
pictures above provide an
exterior aerial photo of Ford's Willow Run Factory in Michigan,
along with a view of the production line. The
plant Ford built at Willow Run had an assembly line that was a mile
long and is reported by one source to be the largest covered production
facility at the time. At the peak of its production, the assembly line
was producing a Liberator every hour. To support its operations, Willow
Run had its own airfield and employed 30,000 workers.
The 5,000th B-24 produced at
Willow Run test fires into a bullet trap; Henry
Ford II signs the 8,000th Liberator
 The first completed B-24 rolled off Willow Run's assembly line on May 15, 1942 and production continued until June 28th, 1945. Numerous improvements were made to the Liberator over time and the several "variants" thus produced were identified by a letter after the B-24 designation. The most common Liberators produced were the B-24D and the aircraft dad was shot down on during his tenth mission, the B-24J. Crew & Their Duties A B-24 carried a crew of eight to ten men (a ten man crew was most common) comprised of both officers and enlisted men.
The May 1, 1945 version of the B-24 Pilot Training Manual provides the following duties for each of the crew members. PILOT Principal duty: Airplane Commander Secondary duty: Pilot Added duty: Navigation Specialist COPILOT Principal duty: Assistant Airplane Commander Secondary duty: Airplane Engineering Officer and Assistant Pilot Added duty: Fire Officer Added duty: Navigational Specialist Added duty: Gunfire Control Officer NAVIGATOR Principal duty: Navigator Secondary duty: Qualified as Nose Turret Gunner Added duty: Assistant Bombardier Added duty: Oxygen and Equipment Officer Added duty: First Aid Specialist BOMBARDIER Principal duty: Bombardier Secondary duty: Qualified as Nose Turret Gunner Added duty: Airplane Armament Officer Added duty: Navigation Specialist AERIAL ENGINEER Principal duty: Aerial Engineer Secondary duty: Top Turret Gunner Added duty: Qualified for Copilot Duties Added duty: Parachute Officer Added duty: First Aid Specialist Added duty: Assistant Radio Operator RADIO OPERATOR Principal duty: Radio Operator Secondary duty: Waist Gunner Added duty: Assistant Airplane Engineer Added duty: First Aid Specialist Added duty: Qualified as Top Turret Gunner NOSE TURRET GUNNER Principal duty: Nose Turret Gunner Secondary duty: Turret Specialist Added duty: Assistant to Armament Officer BELLY TURRET GUNNER Principal duty: Belly Turret Gunner Secondary duty: Turret Specialist TAIL TURRET GUNNER Principal duty: Tail Turret Gunner Secondary duty: Turret Specialist Added duty: Assistant to Parachute Officer Among the six enlisted crewmen, each crew typically had three specialists: the Flight Engineer; Radio Operator; and Aircraft Armorer. The Flight Engineer typically manned the top turret as it was closest to his station, but that was not an absolute. Sometimes the flight engineer would be one of the waist gunners. The Radio Operator was usually one of the waist gunners, but sometimes the nose gunner (hardly ever the ball turret or tail gunner as those positions would limit access to the radios). The Armorer was usually a waist gunner, but he could be assigned to any gun position. The Armorer was trained in maintenance of all of the gun positions, bomb racks, etc. He along with the Bombardier was responsible for arming the bombs. Many times the other gunners were rated as Assistant Flight Engineer, Assistant Radio Operator, etc. Lead Crews (and deputy leads) would have a dedicated Radio Operator at the position at all times. They would handle radio communications for the Group. In other crews in the formation, the radio operator would only be at the radio if necessary, if the aircraft had to leave the formation, for instance. He would be responsible for setting up the radios for each flight but would not remain at the radios. The pilots could monitor the command frequencies so it would not be necessary for the radio operator to remain at the radio station. He would man his assigned gun while in hostile territory. Chaff was typically dispensed by the waist gunners, who might or might not be Radio Operators. Pilot The pilot occupied the left seat in the cockpit. He was the commander of the crew and responsible for their safety and efficiency at all times, even on the ground between missions. The pilot was responsible for flying the plane to its target and returning it to base, or an alternate base in the case of trouble or lack of fuel to return. He was also charged with keeping the plane in its proper place in the tight flying formations. Formations were the configurations the aircraft in a raid would form. Formations were designed to maximize the formation's protection and gunner effectiveness, while minimizing enemy aircraft penetration and exposure, all in an effort to deliver the greatest amount of bomb payload to the target. After take-off, the pilot would often enter formation with the aid of crazily painted "formation" or "assembly" B-24s like these shown below. These aircraft were easy to spot and provided a visual aid to help the pilots know where to take their positions in large formations. Formation aircraft did not go on the mission, but served only to aid in forming the important formation. During a large mission, it might take over an hour for the formation to form prior to the formation's actual departure to the target.   
    The copilot sat in the right seat and was the pilot's executive officer. He shared the duties with the pilot during long hours of formation flying. The copilot took over the pilot's duties in the event the pilot was injured or killed. A copilot had to be familiar with navigation, day or night, by pilotage, dead reckoning, or by radio aids. Copilots often went on to pilot their own planes. The copilot was responsible for performing the various checklists including the Before Starting Engines, Starting Engines, Before Taxiing, Taxiing, Engine Run-up Before Takeoff, and Before Takeoff checklists, and many others. As an example, the following presents the Before Takeoff checklist which is a series of questions asked or instructions given with responses or confirmation required by the responsible party, either the pilot, the copilot himself, or the engineer. 1. Trim Tabs? Response by Pilot. 2. Mixtures? Response by Copilot. 3. Exercise Propeller, Turbo-supercharges, and Flaps. Responses by Pilot and Copilot. 4. Propellers? Response by Copilot. 5. Run Up Engines. Response by Pilot. 6. Lock Superchargers. Response by Pilot. 7. Gyros? Response by Pilot. 8. Wing Flaps? Response by Copilot. 9. Flight Controls? Response by Pilot. 10. Doors And Hatches? Response by Engineer. 11. Cowl Flaps? Response by Copilot. 12. Booster Pumps? Response by Copilot. 13. Auxiliary Hydraulic Pump And Power Unit? Response by Engineer. 14. Generators? Response by Engineer. Bombardier It can be argued that since the B-24's ultimate purpose was to bomb targets, the bombardier had the most important job. The bombardier and the pilot had to be familiar with each other's job and cooperate during the short bombing run during which the bombardier took over control of the aircraft either through the auto-pilot or Pilot Directional Indicator (PDI). The auto-pilot connected directly to the bombsight; the PDI transmitted desired course changes to the pilot via a needle instrument in the cockpit. Bombing accuracy depended on correctly calculating altitude, true airspeed, bomb ballistics for each bomb type, drift caused by lateral winds, and air density, all of which impacted the trajectory of the bomb from the bomber to the target. Often, only the lead plane in a group had a bombardier while the other aircraft simply had a "Togglier" who would toggle (i.e., activate) the control for a bomb drop when the lead aircraft dropped its bombs. Use of "Toggliers" appears to have become more common later in the war. Often the lead plane would drop a smoke signal as a further indication of where/when the other bomber should toggle their bomb drops. One of the most highly guarded secrets of the war was the Norden bombsight, the advanced and sophisticated bombsight designed by Carl Norden originally for the U.S. Navy. The innovative design allowed the Allied forces to achieve a higher degree of accuracy in their bombing than had previously been possible. While the Norden or Sperry bombsights were a technological advancement in targeting systems, there accuracy came nowhere close to what was often cited in propaganda of the time. One popular claim by Norden representatives and repeated by many others is that the bombsight could enable a bomb to be “dropped in a pickle barrel” or within “a fifteen foot square”. This was all marketing hype by Norden and the US military designed to instill confidence in the public, and by the military, to lay groundwork for future public support needed for creation of a separate Air Force. Another falsehood is that the bombsight was kept secret throughout the war. This is untrue. A German spy in the US had provided plans for the Norden bombsight to the Luftwaffe. The German’s take on the bombsight was that the cost and effort to develop the bombsight for their use was not worth the investment for the marginal improvement in accuracy. One cause for accuracy not attaining Norden company’s stated accuracy, aside from the complexity of sighting given so many changing variables, is that the bombsight was developed by Norden in trials at lower altitudes and sometimes slower airspeeds than those experienced during actual combat. As further point to the bombsight’s accuracy issues, the US Navy who had funded the bombsight research opted not to use the bombsight and generally abandoned level bombing in favor of dive bombing to achieve greater accuracy. Even so, the bombsight was an improvement and was probably the best technology available at the time and a technology that should have been guarded, as it was. Partly for propaganda reasons and to instill the sense of secrecy bombardiers swore the following oath before they were allowed to see and train with the bombsight: THE
BOMBARDIER'S OATH
"Mindful
of the secret trust
about to be placed in me by my Commander in Chief, the President of the
United States, by whose direction I have been chosen for bombardier
training...and mindful of the fact that I am to become guardian of one
of my country's most priceless military assets, the American
bombsight...I do here, in the presence of Almighty God, swear by the
Bombardier's Code of Honor to keep inviolate the secrecy of any and all
confidential information revealed to me, and further to uphold the
honor and integrity of the Army Air Forces, if need be, with my life
itself."This bombsight was used more than the competing Sperry S-1 bombsight whose production had ended by 1943, even though the Sperry S-1 bombsight had some advantages in terms of ease of use, was faster to synchronize, had ergonomically placed knobs on either side to allow setting course and range simultaneously, eliminated carbon brushes in its internal rotating gyro, among other advantages. The Norden bombsight functioned as just one component in a more complex system. Using the bombsight's analog computer, the bombardier would enter flight data such as airspeed, direction, and altitude and, in about 30 seconds, a correct aim point would be provided taking into account drift. The bombsight used an integral gyroscope to stabilize itself for added accuracy. The bombsight could be connected to the Sperry or Honeywell C-1 autopilot thereby giving control of the aircraft to the bombardier during the actual bomb run. Throughout the war, extreme precautions were taken to ensure the continued secrecy of the bombsight so that the state-of-the-art technology would not fall into enemy hands. The sight was loaded under armed guard onto the aircraft just prior to takeoff and was kept covered from view until the aircraft was airborne. Upon landing, it was immediately removed from the aircraft again under guard, and securely stored. This bombsight, along with the proximity fuse used in Allied artillery, and the atomic bomb, was perhaps one of the three most important secret weapons of the war. Even though the accuracy provided by the Norden bombsight was the best available technology of its day, its accuracy pales in comparison to the accuracy achievable by today's standards. 
 Norden Bombsight Martin Middlebrook notes in his story of the August 1943 Schweinfurt-Regensburg mission that often only the lead plane in the group and a couple others had bombsights and that the other bombers in a group would drop their bombs when the lead's bombs were seen dropping. He notes that the bombardier took over control of the aircraft about three minutes from the target, saying that the pilot turned on the Automatic Flight Control Equipment (AFCE) or auto-pilot linked to the Norden bombsight. Many bomb crew thought toggling on the leader's bomb drop was a waste of bombs and not the best way to do things, but dropping on the leader's drop did eliminate some uncertainty that would have otherwise resulted from allowing individual aircraft to drop their bombs via a bombsight. For example, it would not be long after the first drop before the target would be covered in smoke and debris, virtually eliminating the possibility of accurate subsequent drops. Navigator The navigator used a combination of dead reckoning (using airspeed and time elapsed between checkpoints to compute position), pilotage (using visible landmarks), radio, and celestial navigation.  A navigator charting a course The B-24 had a small Plexiglas dome just forward of the cockpit through which the navigator could take his readings or "shoot his fixes", however celestial navigation was typically only used when initially delivering the aircraft to its theater of operation. In combat, bombing targets were approached by pilotage. Engineer The engineer perhaps knew more about the B-24 than any other member of the crew, including the airplane commander. In emergencies, the airplane commander turned to the engineer. The duties of the flight engineer were to assist the pilot and copilot in monitoring the performance of the engines and to keep track of fuel burn. The engineer was usually also the top turret gunner, a position that allowed him to monitor the four engines. Radioman The radio operator's position was in the upper fuselage aft of the cockpit and the top turret. A radioman would sit for hours listening to the static crackling in his ears and giving position reports every 30 minutes, assisting the navigator in taking fixes and informing headquarters of targets attacked and results. When needed, the radio operator manned the second waist gun.  The Radio Area on the
B-24 Liberator
Lead Crews (and deputy leads) would have a dedicated radio operator at the position at all times. They would handle radio communications for the Group. In other crews in the formation, the radio operator would only be at the radio if necessary, if the aircraft had to leave the formation, for instance. He would be responsible for setting up the radios for each flight but would not remain at the radios. The pilots could monitor the command frequencies so it would not be necessary for the radio operator to remain at the radio station. He would man his assigned gun while in hostile territory. The Gunners - Nose, Top, Ball, Waist, and Tail Gunners were provided specific training depending on their gun position. Gunners were classified as either turret gunners (ball, nose, and tail positions) or flexible gunners (waist position). The waist gunners learned their skill at Flexible Training School. All gunners learned the mechanics of the various guns, how to disassemble and assemble them, even while blindfolded. They practiced skeet shooting, firing from moving platforms, and progressed from using small arms to automatic weapons to heavy machine guns. They practiced shooting from actual turrets mounted on vehicles. They learned how to operate the various turrets, how to sight and swing them. They fired from the nose, belly, and tail. Finally they learned how to sight and fire their guns while flying, the targets being towed by other aircraft. Former B-24 pilot and politician George McGovern thought highly about the gunners and the role they served. Although some on the ground were envious of the perceived "easy duty" and the higher pay the flight crews got, McGovern concluded that "... all of them, but most of all the gunners, were entitled to every dollar they got in pay and every decoration they got and they were entitled to more praise than they got from me." The following specific descriptions pertain to the various gunner positions. Nose Gunner The nose gunner had a good (and probably frightening) view of the bomb run. He operated an Emerson Electric A-15 turret. Directly in front of him was a thick piece of bullet resistant glass which moved up and down with the gun sight. It was frigid during the long hours spent cramped in the tight accommodations of the nose turret, even with the electric suits they wore. There was not a tight fit between the nose turret and the fuselage and cold air blew into the plane through the gaps. 

Emerson nose turret
Nose
lost
due to a flak hit
As noted in the description of the ship's engineer, the top turret gunner's position provided a good view of the engines as well as a panoramic view of the surrounding airspace.   Images
of Gunners in Their B-24 Top Turrets
Ball Turret Gunner Small men were generally chosen as ball turret gunners. There was no room for a chute in this cramped position. He usually did not climb in until after take-off and climbed out again before landing. On a B-24 Liberator the ball turret was hoisted into the fuselage for takeoff and landing. Some B-24s had a "ring gun" instead of the ball turret. A ring gun consisted of two .50 caliber machine guns which could be manually moved along a circular track mounted to the floor around the opening in the floor of the aircraft. Judith M. Heimann mentions this arrangement as one of the gunner positions in her book entitled The Airmen And The Headhunters about a B-24 shot down over the jungles of Borneo. Although Heimann indicates in her novel the aircraft on which the crew was shot down was a B-24J, the ring gun was more common on the B-24L. Below you will see another version of an internally-mounted gun, called a tunnel gun, designed to fire through the floor of the aircraft. The gunner's view was aided by small windows mounted low on the fuselage on either side of the floor opening.    Left is a diagram showing
the orientation
of the
ball turret gunner. The middle photo tells a sad story of a
gunner
who had become trapped in his turret during a belly landing
(wheels could not be deployed). The photo on the right shows a tunnel
gun used on some early versions.
One B-24 crewman remembers that a ball turret gunner got frostbite of the ears on one mission, and that his eyelids were frozen shut during a mission to Linz. It was not unusual for the temperature to drop to -50 degrees when the ball turret was lowered into the slipstream after the aircraft had achieved altitude. Middlebrook tells the story of one lucky ball turret gunner, Staff Sergeant Aubrey Bartholomew, who had his hatch blown away due to a nearby flak explosion over Regensburg. The gunner began to fall from his turret, without a parachute as one could not be worn in such tight quarters. The fall caused his oxygen line to sever, but S/Sgt. Bartholomew was able to catch hold of the range pedals of his turret mechanism with his feet. At 17,000 feet over Germany in the cold, blowing slipstream of the aircraft, S/Sgt. Bartholomew, upside-down and hanging on only by his feet, was able to haul himself back into the shattered remains of his turret where he soon passed out due to lack of oxygen and exertion. Shortly thereafter his crewmates pulled him from the turret back into the safer confines of the aircraft as the bombers headed over the Alps to the safety of South Africa. S/Sgt. Bartholomew later recounted the experience as "memorable". Tail Gunner The tail gunner covered all points aft of the ship and had a wonderful view of the following formation and the flak. Because of the broad view available, the tail gunner was relied upon to look out for enemy aircraft and announce their presence. The tail gunner manned two .50 cal. machine guns in a rotating turret. Quarters were cramped especially when the entrance doors to the turret were closed. One significant disadvantage is often associated with the tail turret gunner's position. Crew in the ship would urinate into funnels attached to a hose that exited the side of the aircraft. The urine would flow from the relief tube down the slipstream along the sides of the bomber and enter the turret through gaps between the turret and the body of the aircraft. Many a tail gunner would threaten his crew mates if they dared to use the relief tube while he was in his turret. Waist Gunner The right waist gunner was my father's position, in addition to his armorer duties. The waist gunners had the unfortunate distinction of being in the most dangerous spot on the plane. The waist gunner position suffered the most casualties as compared to the other crew positions. The waist gunners would often hang small metal plates from the back of their guns to provide some amount of armor protection to their chest and torso area while shooting. Even so, it was the least well-protected position, both from the enemy and the elements. Frostbite was a major concern. Unlike the nose, ball, and tail turrets, which dumped spent .50 caliber shells through shoots in the floor or into holding bins, the floor around the waist gunners filled with spent shells during attacks. The gunners sometimes used a shovel just to clear a place to stand. At the end of prolonged shooting a waist gunner's face would often be the color of brass due to the fine brass dust the guns would eject. 

 The
right waist gunner's view
and B-24 waist gunners in full gear
The waist position
usually had one dedicated gunner. The
radio man,
when available, was the second gunner. Other sources imply that radio
duties were secondary for one of the two waist gunners. The earlier
guns used simple open iron sights, but as wartime technology improved,
reflector sights, and then compensating reflector sights, such as the
Sperry K-13 Compensating Gun Sight and other Sperry models were added
which took into account air speed and relative speed of target.   As the ship's armorer, dad was trained to inspect, repair, and maintain all aircraft armament, including the bomb release mechanism, airplane cannons, machine guns, auxiliary equipment, and could have been called upon to repair other weapons. The armorer also made daily inspections and repairs to equipment, such as bomb racks, bomb release mechanism, aerial gun sights, flare racks, flare rack controls, and chemical carrying release mechanisms; installed armament equipment on airplanes; installed fuzes and placed bombs in bomb racks; disassembled guns and inspected them for worn, broken, or defective parts; made necessary replacements or repairs and reassembled weapons after thoroughly cleaning and oiling their working parts; manned a machine gun position if combat occurred during flight. At altitude the temperature could easily be 20 or 30 degrees below zero or less with near gale force winds coming in through the waist gunner's open window, causing frost to form on his machine gun and ammo boxes. The was no armored plating protecting the waist gunner's position; in fact the aluminum skin separating him from the outside world was so thin you could push a screwdriver through it. Bailing Out The graphics below show the typical exits a crewman would take during a bail out. These exits include the nose wheel bay, the forward bomb bay, the rear bomb bay, and the rear hatch.  In the book Into The Fire by Schultz (Westholme, October 2007) about the August 1, 1943 low level raid on Ploesti, the author notes "On board the B-24, moving from one part of the plane to another could be dangerous. Passage from the cockpit to the rear required crewmen to cross a narrow catwalk in the middle of the bomb bay. One waist gunner had commented that it was so tight in there that you couldn't walk through without brushing into the bombs on either side. One misstep and you would put your weight upon the bomb bay doors. These could not support extra mass, and it would be a free ride to the ground. The bomb bay doors opened by sliding up and down like an old-fashioned roll-top desk. If during a bombing run the doors would not open, the bombs could be released anyway because the doors were designed to give way under the weight of the bombs, or the weight of a man." Dad was the last to bail out of his B-24 on November 16, 1944. Before he bailed out, he made the trip described above from his waist gun position, over the narrow bomb bay catwalk, all the way to the cockpit to see if the pilot was still there, all in the hope to get to Switzerland. It is amazing that dad was able to make that walk and still bail out of an un-piloted, heavily damaged and doomed Liberator. The memoir of one of his crewmates, John Bills, indicates that if dad had remained a minute longer he would have crashed with the plane. I am not sure if that action had anything to due with the fact that he was awarded the distinguished flying cross, one of our nation's great honors. 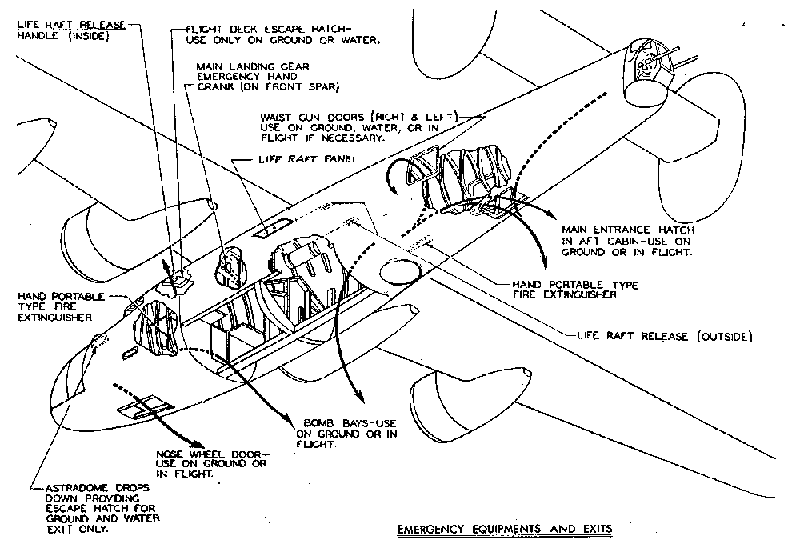 Click on the small image above for an expanded view of the various emergency and bail out exits. The drawing appears to be that of a B-24D as there does not appear to be a nose turret; however, the drawing is merely a rough schematic. Martin Middlebrook, in his book entitled The Schweinfurt-Regensburg Mission, talks about the morale of the bomber crews and notes one flier as indicating one prevalent thought was that the chances of making it through all of the required missions was slim and that the hope was to be able to bail out and hit the ground alive, while the best hope was to get to Switzerland or Sweden or be picked up by the Resistance forces. That flier indicates this somewhat humorous anecdote - "Our squadron navigator had been a college mathematics teacher in Pennsylvania and he calculated on a slide-rule the odds against completing our tour. The odds were so phenomenal that he threw the ruler away and said there was no chance". Based on aircraft losses that typically ranged from 6% to 50% per mission, it was almost intuitive that a airman could not expect to complete the required number of mission for a full tour. Layout of the Aircraft The first image below, the "Visible B-24", shows locations of the crew and the general layout and construction of the B-24. The two cutaways of a B-24's fuselage provides good information on location of crew, equipment, and controls. The B-24 was essentially divided into four distinct compartments: the bombardier-navigator's compartment in the nose of the aircraft which contained the navigational equipment, bombsight, bomb controls, and nose guns or nose turret; the flight deck which included the pilot's compartment, radio operator's station, and top gun turret; the bomb bay compartment in the center of the aircraft under the center wing section (half deck is located above the rear bomb bay); and the rear fuselage compartment which contains the lower gun turret, waist guns, bottom camera hatch, photographic equipment, and the tail gun turret. During takeoff and landing crew were not permitting in compartment 1 because of the danger and injury involved if the nosewheel were to collapse or if the wheel were to lock. Similarly, crew were not permitted in compartment 3 or aft of the waist gun windows in compartment 4. The purpose of restricting crew from aft of the waist gun windows was to ensure that the center of gravity was not shifted rearward. 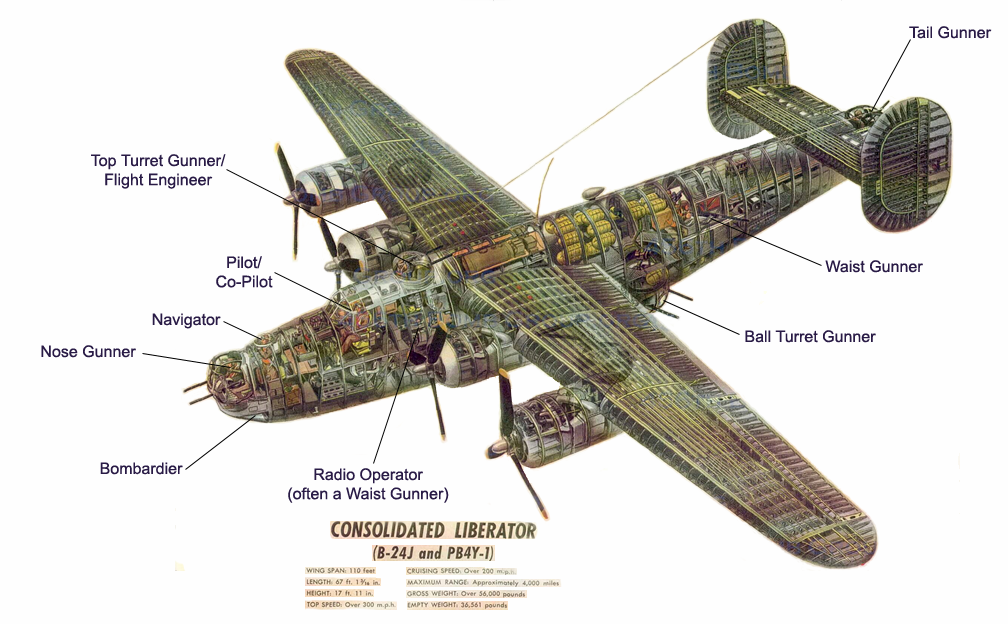  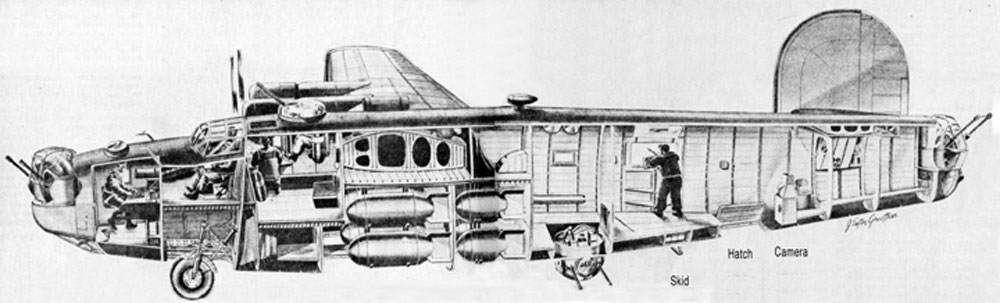  ~~~~~x~~~~~x~~~~~x~~~~~x~~~~~x~~~~~x~~~~~x~~~~~x~~~~~x~~~~~x~~~~~x~~~~~x~~~~~ B-24 Liberator Units of the 15th Air Force, (Robert Dorr, Osprey Publishing Ltd., 2000) B-24 Pilot Training Manual for the Liberator, (Headquarters, AAF, May 1, 1945) Bombers Over Normandy (DVD), (Goldhil Entertainment, Camarillo, CA, 2007) Consolidated B-24 Liberator, Vol. 1, Warbird Tech Series, (Frederick A. Johnson, Specialty Press Publishers and Wholesalers, North Branch, MN, 1996) Flight Check - Bombers, The How To Fly Series (DVD), (Timeless Media Group, Eugene, OR, 2007) Flight Manual, B-24D Airplane, Appendix A - How To Fly The B-24D Airplane, (San Diego, CA) Forever Flying, (R. A. "Bob" Hoover, Pocket Books, 1996) Gunner - An Illustrated History Of World War II Aircraft Turrets and Gun Positions, (Donald Nibjoer, The Boston Mills Press, 2001) History of the 460th Bomb Group, (Duane L. and Betty J. Bohnstedt, Taylor Publishing, 1996) Into The Fire, by Schultz (Westholme, October 2007) Log of the Liberators, (Steve Birdsall, Doubleday & Company, Inc., Garden City, New York, 1973) Masters of the Air: America's Bomber Boys Who Fought the Air War Against Nazi Germany, (Donald L. Miller, 2006) Military Occupational Classification of Enlisted Personnel Water Department, War Department July 12, 1944 Strategic Bombing By The United States In World War II: The Myths And The Facts, (Stewart Halsey Ross, McFarland & Co., Inc., Jefferson, NC, 2003) The Airmen And The Headhunters, (Judith M. Heimann, Harcourt Inc., Orlando, FL, 2007) The Schweinfurt-Regensburg Mission, (Martin Middlebrook, Charles Scribner's Son, 1983) Time Out (John A. Vietor, Richard R. Smith Publisher, Inc. New York, 1951) Wings of Morning: The Story of the Last American Bomber Shot Down over Germany in World War II, (Thomas Childers, Addison-Wesley Publishing Co., 1995) Miscellaneous Internet research Click HERE to go to source page. |